Showing posts with label cake toppers. Show all posts

Thursday, January 14, 2010

david & hiro's wedding


My brother, David, got married to his boyfriend, Hiroyuki, on December 28 in Lenox, Massachusetts!! They asked me to be their justice of the peace, so I officiated their wedding! I was flattered and the wedding was amazing and perfect and so beautiful! I did a bunch of crafty stuff for it, too, so I have an excuse to blog about it ;) For instance, I made their cake topper (above) out of two wooden "boys" (the package said "boys" but they were really just wooden pegs), tiny plastic hats (that I just so happened to have laying around the house from, I guess, some other project I had meant to do), and the top of a cardboard heart-shaped box that I painted white. I painted the suits 2 days before the wedding when they were out of the house, by which time I knew what color their tuxes would be.

The bow wasn't actually attached to the topper, I just put it there for effect. I did attach it to each wedding favor, though (above)! I got them from this wonderful etsy site, Little Spark Creations. It was a small wedding (22 people in all) and I couldn't find a site that would custom-print ribbons without buying 50 or more! Little Spark Creations offered custom ribbons at a 25 count for only $10! What a deal! Not only that--they came out exactly how I wanted, and I was able to tie them into the most perfect little bows for the wedding favors!

Here is where the edible stuff comes in...

A tiny chocolate cake!!! Made from melting chocolate wafers :) Does it get any cuter than this? Everything I needed came in this kit at AC Moore. This big box included 25 fold-up boxes and lids, 3 or 4 bags of chocolate wafers, 25 blank tags (which I ended up not using), and a mold for the tiny cakes :)
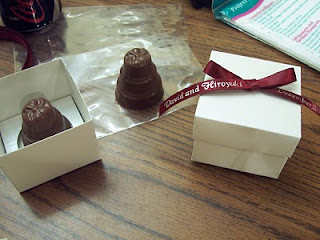
My 11-year-old cousin Jack thought it was delicious :)

Here is the cake!!


The happy family:
A candid moment:Bro and sis:

Yay! A perfect day for love.

Saturday, December 19, 2009

Twilight Red Velvet Cupcakes!

It was my co-worker's daughter's 10th birthday celebration yesterday and I know she and her sister love red velvet cupcakes. I was also feeling inspired by Magnolia's Rockette cupcakes, so I decided to make some... from scratch! I used Martha Stewart's Cupcakes book.

I was curious about what was actually in red velvet to make it so red! Turns out it's mostly just red food coloring:
Yuck.. looks like blood. Good thing these are Twilight-themed! This is the sugar, oil, eggs, food coloring and vanilla. The other bowl has the cocoa powder, cake flour and salt.

Then you're supposed to combine the 2 while intermittently adding buttermilk. I didn't add the buttermilk.
Ew. So far, so gross! It looks like bacon in some sludgy form. So, be sure to remember the buttermilk.
There. I added the buttermilk. Now it looks more brown than red, though! So I dashed in a lot more food coloring.

In Martha's book it says it's called red velvet mostly because of the reaction the vinegar has with the cocoa powder. Yes, there is vinegar in red velvet cake. Who comes up with this stuff? I felt like I was making a science fair volcano because I had to mix the vinegar and baking soda in a small bowl before adding it to the mixture. Fizzzzzzz.................


It wasn't much of a volcanic reaction, otherwise I'd've taken a picture or videotaped it and shared. It was actually kind of a let-down. Maybe I should make a volcano anyway, since I have red food coloring and all that.

I have this method of putting the batter in the cupcake tins. I get a big spoon-ful of the mix and pour it in each cup, letting it fly all over the rest of the tin, because this is not a clean way of going about it. It looks like a Jackson Pollock painting. I call it "Batter Splatter":
It also looks violent.. This red food coloring is pretty creepy, actually. They came out of the oven beautifully, though!

I even make 5 mini ones with the leftover batter. How cute! They look like macarons.

Then it was time to make the cream cheese icing. Okay, Martha, whaddaya got?

FOUR cups of sifted confectioners' sugar. This is no easy task when your sifter is on its very last legs. Our sifter's spring is just about to pop out, so to use it you have to pull it back, then stop and push it back in. Each time. This was a labor of love. Four cups of love, to be exact.


Two sticks of unsalted butter, and 12 ounces of cream cheese, room temperature. It's good to read ahead; I did not. Straight from the fridge, butter and cream cheese are preeeeetty difficult to mix together. After waiting for what seemed like long enough and it still wouldn't work, I filled a zip-loc bag full of warm water and let it sit on top of the ingredients in the bowl. After a few minutes it was ready! So that is my tip for you, if you end up not reading ahead, like me.

Then add the sugar...
Mmmmmmmmmm!

Yeaaaahhh!! I barely had time to ice all 24 before I ran off to class, and I was a few minutes late! I tried to ice them like Magnolia's... The one on the left looks kind of close! :)

After class I made the decorations. I printed out a bunch of pictures of the characters from Twilight and New Moon, as well as some "Team Jacob" and "Team Edward"...
I bought this big paper-punch that makes the shape of scalloped circles--they're just so pretty, right? I was excited. I'd seen these kinds of things being sold on etsy, but I figured I could make them, too.

The girls just LOVED it, calling, "I'm Team Jacob!!" and "I want Team Edward!!" The little boy there even said, "Team Apple!" because of the Twilight book cover art. Awww. So I got to find out how red velvet is made, AND I made some 10 year olds happy! :)